
How to Grow Sunflowers from Seeds: A Real Grower’s Guide (Not the Boring Kind)
There is something almost magical about dropping a tiny seed into the ground and watching it stretch into a towering, golden bloom by midsummer. Growing sunflowers from seeds is one of the most rewarding things you can do in a garden, whether you have a sprawling backyard in Texas or a few containers on a patio in Chicago.
But here is what most beginner guides skip — the difference between a sunflower that thrives and one that barely survives comes down to a handful of decisions made before the seed ever touches soil. Getting the seed depth, soil preparation, germination conditions, planting time, and watering schedule right from the start is what separates a five-foot showstopper from a sad, drooping disappointment. Read our full Flower Gardening guide.
This guide is based on real experience, real mistakes, and years of watching these cheerful, almost arrogant plants grow in American backyards. Whether you have a sprawling garden in Ohio or a couple of containers on a Brooklyn apartment balcony, this will help you grow sunflowers that actually thrive.
Why Sunflowers Are Worth Every Bit of Effort
Before we get into the how, let me give you the why — because sunflowers are genuinely underappreciated.
They attract pollinators like crazy. The USDA Natural Resources Conservation Service has documented that sunflowers (Helianthus annuus) are one of the top pollen sources for native bees in North America. If you have a vegetable garden nearby, planting sunflowers is not just decorative — it is functional. My tomato yields improved noticeably the season I planted sunflowers along the border of my raised beds.
Beyond that, sunflower seeds are edible, the oil is useful, the dried heads make perfect bird feeders in fall, and honestly, few things are as visually rewarding as a healthy sunflower standing eight feet tall in late July.
Choosing the Right Variety Before You Buy a Single Seed
This is where most people skip ahead too fast. They grab a seed packet at the grocery store without knowing what they are actually buying, and then wonder why their “sunflowers” topped out at two feet.
Here is a breakdown worth knowing:
Mammoth Russian is the classic giant variety. It can reach ten to twelve feet with seed heads the size of dinner plates. This one is what most people picture when they think of a sunflower.
Teddy Bear is a compact, fluffy double-petaled variety that stays around two feet tall. Perfect for containers or front porch planters. It has a somewhat shaggy, almost comedic appearance that kids love.
Autumn Beauty produces blooms in shades of burgundy, bronze, and gold rather than the standard yellow. Great for fall arrangements and really stands out in a mixed garden border.
Lemon Queen is a pollinator magnet. It grows to about six feet and produces dozens of medium-sized blooms per plant. The University of California Cooperative Extension actually featured this variety in pollinator habitat studies as one of the most visited flowers by native bees.
Pro Growers’ Secret: If you want cut flowers for vases, choose pollenless varieties like Sunrich Gold or ProCut Orange. Regular sunflowers drop pollen everywhere — on tablecloths, on guests, on your cats.
Understanding Your Growing Window (This Is Crucial for USA Growers)
Sunflowers are warm-season plants. They do not tolerate frost. In most of the continental United States, the planting window for direct sowing is between late April and mid-June, depending on your hardiness zone.
The USDA Plant Hardiness Zone Map is the standard reference here. If you are in Zone 5 (think Chicago or Denver), wait until soil temperatures consistently hit 50°F before sowing. In Zones 8 through 10 (Houston, Phoenix, parts of California), you can sometimes get two plantings per season.
Our Planting Date Calculator gives you your exact sowing window based on your climate zone — not just a frost date, but a full seasonal planting timeline so you know precisely when to get seeds in the ground. This tells you how much growing time you have and keeps you from planting into frozen ground in March and wondering why nothing sprouted.
How to Prepare Your Soil the Right Way
Sunflowers are not fussy, but they are not invincible either. They prefer well-draining soil with a pH between 6.0 and 7.5. Heavy clay soil will stunt the roots and invite rot. Sandy soil drains too fast and starves the plant of nutrients.
The fix for both extremes is the same: compost. Work two to three inches of compost into the top six inches of your soil before planting. This improves drainage in clay soil and improves water retention in sandy soil. It is the one amendment that helps in almost every situation.
If you are using raised beds, a mix of 60 percent topsoil, 30 percent compost, and 10 percent coarse perlite is genuinely hard to beat. I have been using this blend in my 4×8 raised beds for four seasons and it has never let me down.
If you are filling a raised bed for sunflowers this season, the Raised Bed Soil Calculator tells you exactly how many bags of each material to buy based on your bed dimensions.
Avoid high-nitrogen fertilizers at planting time. This is a trap many beginner gardeners fall into. Too much nitrogen early on pushes the plant to grow beautiful green leaves while actually delaying or reducing flowering. You want a balanced fertilizer or nothing at all until the plant is established.
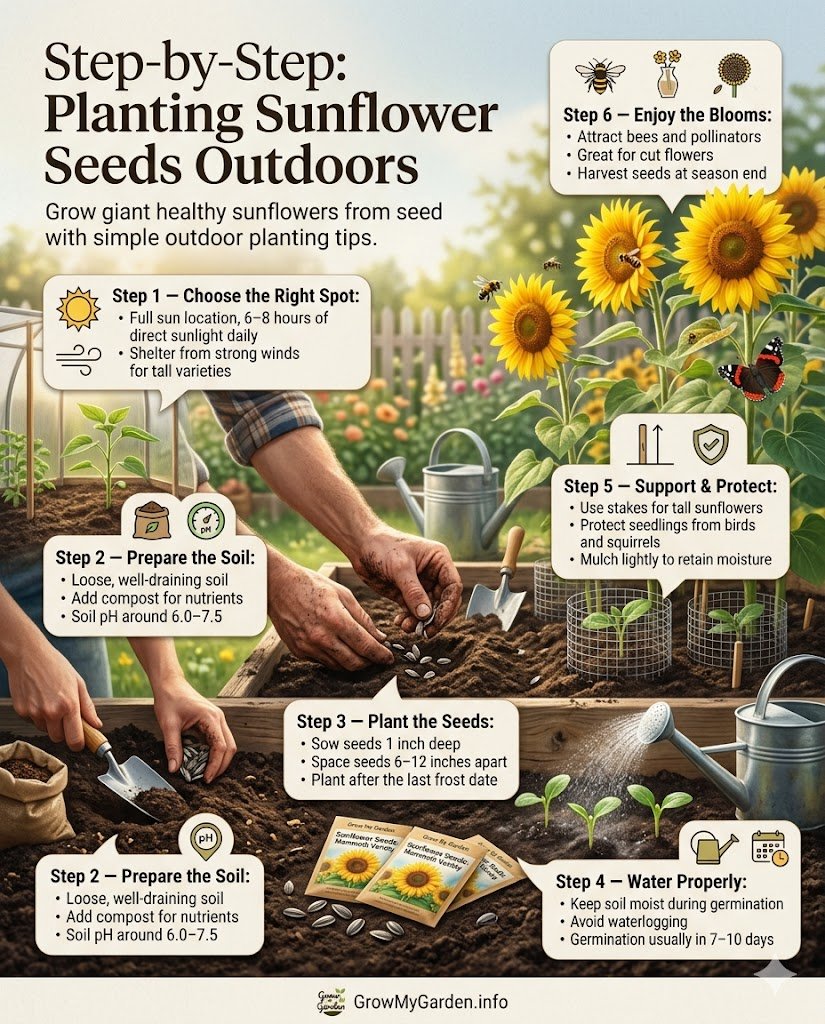
Step-by-Step: Planting Sunflower Seeds Outdoors
Here is exactly how I plant sunflowers every season, refined through several years of experimentation.
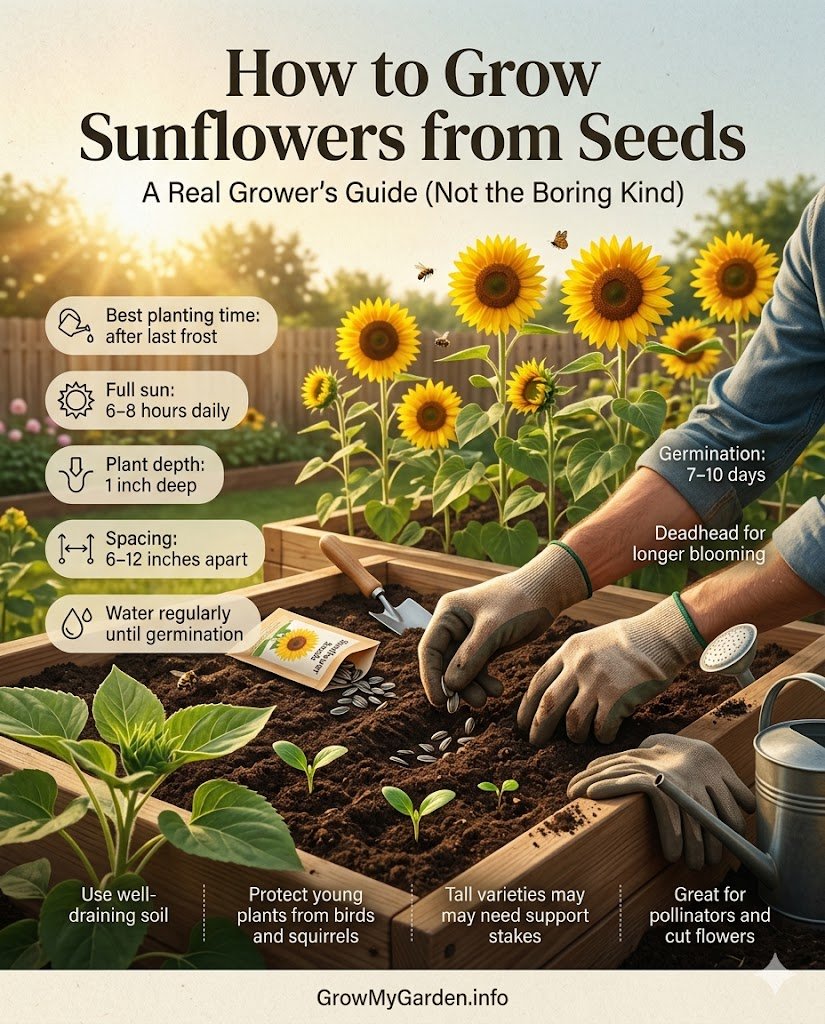
Step 1: Pick your spot. Sunflowers need a minimum of six hours of direct sunlight daily, but eight or more is ideal. A south-facing spot is usually the winner. Keep them away from areas where large trees or structures will cast afternoon shadows. They will actually lean and twist trying to find sun, which looks awkward and weakens the stalk.
Step 2: Loosen the soil. Use a garden fork or tiller to loosen the soil to about twelve inches deep. Sunflowers have a taproot that wants to go straight down. Compacted soil is like a concrete ceiling — the root hits it and the whole plant suffers.
Step 3: Sow the seeds one inch deep. Place each seed pointy end down, about an inch below the soil surface. Cover loosely. Press the soil gently over the top, but do not compact it.
Step 4: Space them correctly. For giant varieties, give each plant at least two feet of space. For smaller varieties like Teddy Bear, eighteen inches is workable. Crowding is one of the most common beginner mistakes because those tiny seeds look so insignificant. In eight weeks, each one becomes a full-sized plant competing for light and water.
Not sure how many seed packets to buy before you start? The Seed Quantity Calculator estimates exactly how many seeds you need based on your planting area and spacing — so you do not buy too few or waste money over-ordering.
Step 5: Water after planting. Give the area a thorough, gentle watering. Do not blast the seeds out of position with a hose. A gentle rain setting on a nozzle or a watering can works best. Then hold back. Do not water again until the top inch of soil is dry. Overwatering seeds before germination is how I killed that first batch.
Germination: In warm soil (around 70°F), most sunflower varieties sprout within seven to ten days. If your soil is cooler, give it up to fourteen days before worrying.
Starting Seeds Indoors (And When It Actually Makes Sense)
Most experienced sunflower growers will tell you that direct sowing outdoors beats indoor starting almost every time. Sunflowers develop a taproot very early and they absolutely hate having that taproot disturbed during transplanting.
That said, if you are in a short-season climate (Zone 4 or 5) and you want to get a head start, starting seeds indoors two to three weeks before your last frost date is reasonable. The key rules for indoor starting:
Use biodegradable peat pots or soil blocks. Never plastic cell trays. When you transplant, put the whole pot in the ground so you never touch the roots.
Plant only one seed per pot. Thinning sunflowers indoors means pulling out one seedling that is tangled with another, which damages both.
Provide at least fourteen hours of light per day. Without enough light, seedlings stretch toward the nearest window and develop a weak, spindly stem. A basic grow light on a timer from Amazon (brands like Roleadro or Barrina are popular and affordable) makes a genuine difference here.
Harden off before transplanting. For one week before moving them outside, set the pots outside in a sheltered spot for a few hours each day to acclimate them to wind, outdoor temperature swings, and direct sun.
Watering: Less Is More (Until It Is Not)
Young sunflower seedlings need consistent moisture. Once they are about a foot tall, they actually do well with deep, infrequent watering rather than light daily watering. Watering deeply once or twice a week encourages the roots to go deep, which makes the plant more drought-tolerant and wind-resistant.
If you want a consistent watering plan rather than guessing week to week, the Watering Schedule Tool calculates how much water your plants need based on what you are growing and your local conditions.
A simple soil moisture meter from any garden center or Amazon (brands like XLUX are dirt-cheap and reliable) takes all the guesswork out of this. Stick it in the ground near the base of the plant and it tells you whether you need to water. No more guessing.
During a heat wave or extended drought, increase frequency. During a rainy week, pull back entirely. Sunflowers are tough, but they sit in waterlogged soil the same way people sit in wet shoes — not for long without consequence.
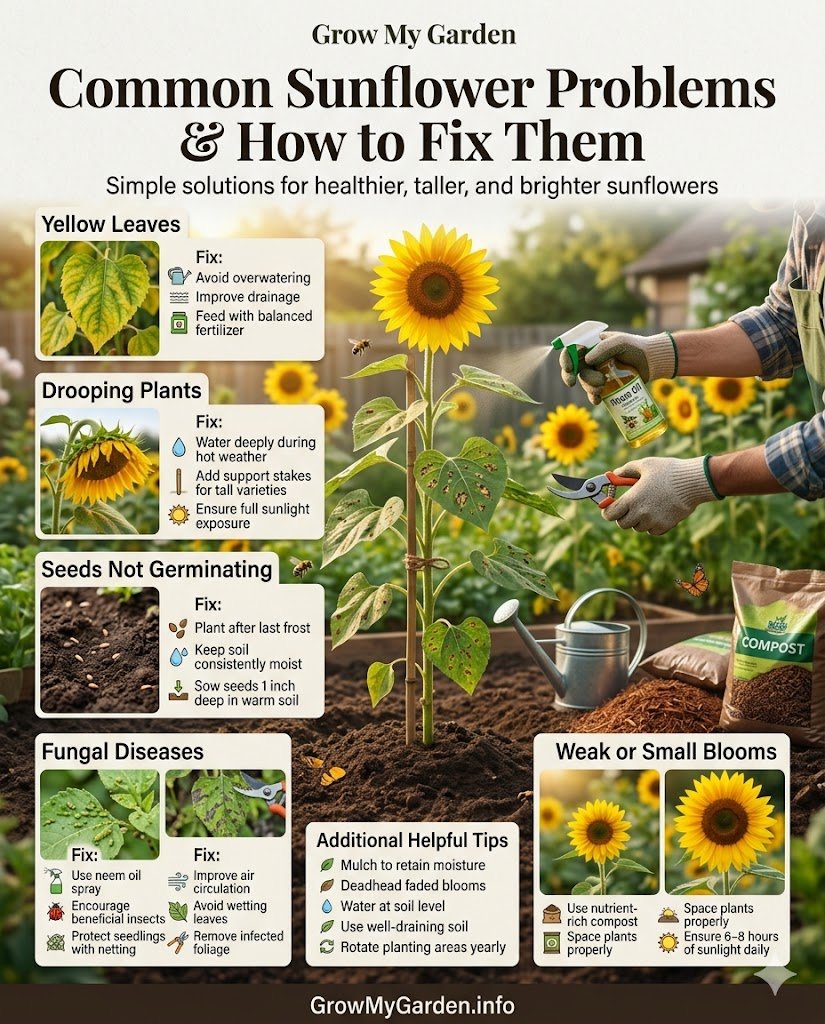
Common Problems and How to Fix Them
Yellowing lower leaves: Usually a nitrogen deficiency or a watering inconsistency. Feed with a balanced liquid fertilizer and check your watering schedule.
Drooping head before bloom: Often just the weight of the developing flower head on a stem that needs more support. Stake the plant with a garden bamboo cane tied loosely with twine. Do not tie it tight — the stalk needs room to thicken.
Aphids: These tiny green or black insects cluster on new growth and stems. A strong spray of water knocks them off. For persistent infestations, neem oil diluted in water works very well and will not harm pollinators if sprayed in the evening after bees have gone home.
Powdery mildew: White powdery coating on the leaves, usually appearing in late summer when nights get cooler. Improve air circulation by removing crowded plants nearby. A baking soda and water spray (one tablespoon per gallon) can slow its spread.
Birds eating your seeds: This is actually a later-stage problem, once the seed head is mature. If you want to harvest the seeds yourself, tie a loose paper bag or a piece of old mesh fabric over the head once it starts browning. Birds are persistent and clever. Do not underestimate them.
Harvesting Seeds and What to Do Next
Once the petals drop and the back of the seed head turns from green to yellow-brown, your sunflower is moving into harvest territory. The seeds should feel firm and the husks should show the familiar black-and-white stripes of a mature seed.
Cut the head off with about a foot of stem attached and hang it upside down in a dry, airy garage or shed for one to two weeks. Then rub the seeds out with your palm over a bucket.
You can roast them at 300°F for thirty minutes with a light olive oil and salt coating for a genuinely satisfying snack. Or dry them and set them out as bird feed. Or save the best-looking seeds in a paper envelope in a cool, dark place to plant next season.
Wrapping Up the Season Right
After your sunflowers finish, leave the stalks standing for a few extra weeks. Finches, chickadees, and other seed-eating birds will work through the remaining seeds in the head as natural foragers. It is free bird feeding and genuinely entertaining to watch from a kitchen window on a November morning.
Then cut the stalks at ground level and chop them into the compost pile. The root system will decompose naturally over winter and add organic matter to your soil. By spring, the same patch of ground will be slightly richer than it was the year before.
Growing sunflowers from seeds is one of the most satisfying gardening experiences available to anyone with a patch of ground and a bit of patience. The return on investment, in color, pollinators, food, and plain old visual joy, is hard to beat anywhere else in the garden.
FAQs About Growing Sunflowers From Seed
What is the best way to grow sunflowers from seed?
The best way to grow sunflowers from seed is to plant them directly in the garden after the last frost. Choose a sunny spot with loose, well-draining soil. Plant seeds about 1 inch deep and 6 inches apart, then water gently and keep the soil moist until they sprout.
How long do sunflower seeds take to start growing?
Sunflower seeds usually start to grow in 7 to 10 days when the soil is warm and moist. In cooler soil, germination may take up to 14 days.
How many sunflowers will grow from one seed?
One sunflower seed usually grows into one sunflower plant. Depending on the variety, that plant may produce one large flower head or several smaller blooms.
Is it necessary to soak sunflower seeds before planting?
No, soaking sunflower seeds is not necessary. Sunflower seeds usually germinate well without soaking. However, soaking them in plain water for a few hours may help soften the seed coat and speed up sprouting slightly.
How long should you soak sunflower seeds in salt water?
For planting, it is not recommended to soak sunflower seeds in salt water. Salt can damage the seed and reduce germination. If you want to soak them before planting, use plain water for 4 to 8 hours, then plant them right away.


Leave a Comment