
How to Grow Roses From Cuttings in Water (A Real Gardener’s Guide That Actually Works)
Growing roses from cuttings in water is one of those gardening tricks that feels almost too simple to be real — until you watch those first white roots curl out of a bare stem sitting in a mason jar on your kitchen windowsill. I started water propagation completely by accident, trimming back an overgrown climber in my backyard and thinking, why not try it? What followed changed how I approach my entire garden.
No grafting, no expensive equipment, no complicated process. Just a healthy rose stem cutting, clean water, a little patience, and the right conditions. Whether you are growing hybrid tea roses, climbing roses, or a treasured heirloom variety, this method works beautifully — and costs almost nothing.
This guide covers everything: how to choose the right cutting, the science behind why water propagation works, what to add to your jar to speed things along, how to troubleshoot when things go sideways, and how to make the transition to soil without losing the plant you worked so hard to grow. Read complete Flower Gardening guide
Growing from cuttings can save you serious money over time. Curious how much your garden is actually saving you versus buying from a store? The Garden Cost Estimator breaks it down for you.
Why Water Propagation Works (And When It Does Not)
Roses are tougher than most people give them credit for. The stem of a healthy rose contains meristematic cells — basically plant stem cells — that can be triggered to develop into adventitious roots under the right conditions. Water propagation keeps the cutting continuously hydrated while those root initiation signals build up at the base of the stem. Because there is no soil compaction to push through and no watering schedule to second-guess, the process is more controlled than soil rooting.
There is also the visibility factor. When you root in soil, you are essentially guessing until the cutting either perks up with new growth or quietly dies on you. With a transparent container, you watch callus formation happen, you see the first white root tips emerge, and you can monitor the entire process in real time. That visibility is not just satisfying — it helps you catch problems like stem rot or algae growth before they kill the cutting.
That said, water propagation is not the fastest route. Expect two to six weeks for meaningful root development, depending on the rose variety, the season, and how much light and warmth the cutting receives. It rewards patience far more than it rewards speed.
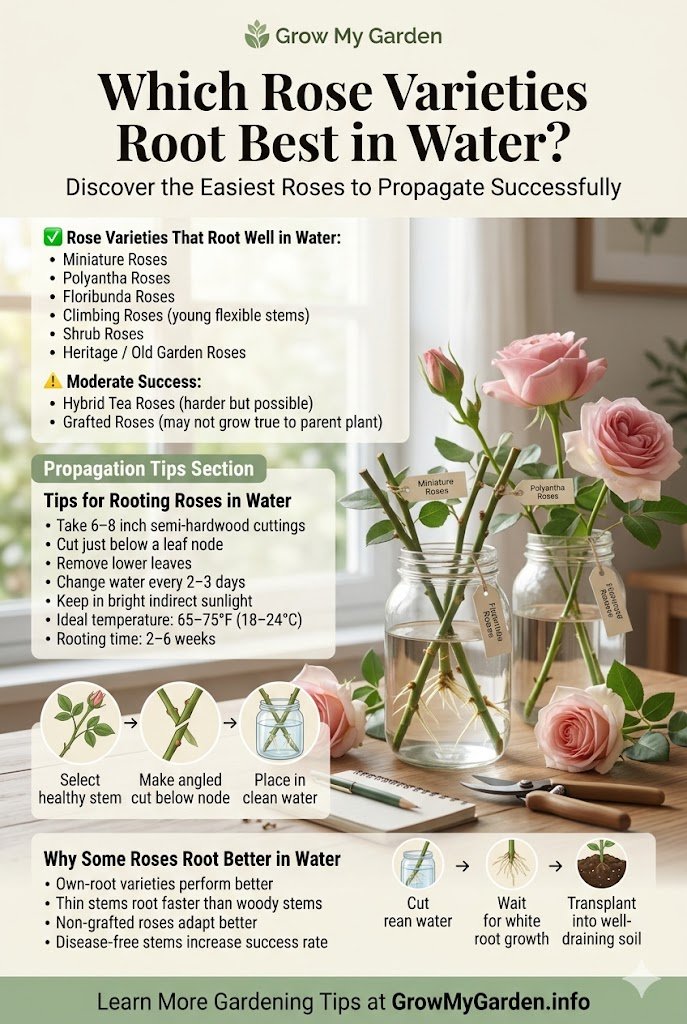
Which Rose Varieties Root Best in Water
Not all roses behave the same way when you try to propagate them. Here is what I have found through experience:
Climbing roses are some of the easiest to root in water. Their stems are often pencil-thick and vigorous, which means they carry plenty of stored energy to push through root initiation. The cutting I eventually succeeded with after my early failures was a climbing rose, and it rooted beautifully within about four weeks.
Wild roses and old garden roses are similarly cooperative. These varieties have not been heavily hybridized, so they tend to have stronger natural rooting instincts.
Floribunda roses fall somewhere in the middle. They root reasonably well but can be fussier about temperature and light during the process.
Hybrid tea roses — the classic long-stemmed varieties you see at florists — are the most challenging. They have been bred so extensively for bloom characteristics that some of their natural vigor has been sacrificed. That does not mean you cannot propagate them; it just means you need to be more careful about cutting selection and conditions.
Miniature roses are surprisingly good candidates. Their stems may be slender, but they root quickly and adapt well to water propagation.
One important note for US gardeners: if the rose you want to propagate has a tag from the nursery that says “propagation prohibited” or lists a patent number, it is a patented hybrid tea or modern variety and cannot legally be reproduced without a license. Stick to heirloom roses, wild roses, roses passed down through family gardens, or any variety clearly out of patent protection.
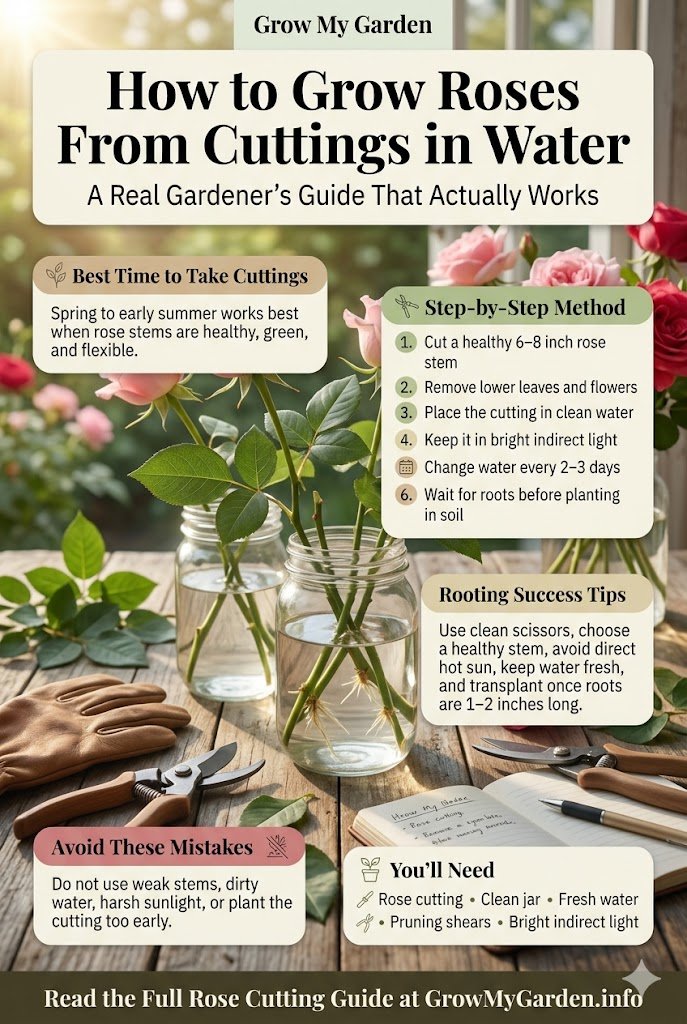
Timing Your Cuttings: When to Snip
The best time for spring propagation is late spring through midsummer, typically May through July across most of the continental United States. This is when roses are in their most active growth phase and the stems carry the highest concentration of the hormones and nutrients needed for root initiation.
The ideal cutting comes from a stem that has just finished blooming or is midway through its bloom cycle — what gardeners call the after-blooming period. Avoid stems that are completely dormant (too little energy) or stems with very young, bright-red new growth at the tips (too immature to root well).
If you are working with summer cuttings in the South or Southwest where temperatures regularly hit 95°F or above, aim to take your cuttings in the early morning and get them into water quickly. Heat pulls moisture out of a cut stem faster than you might expect.
If there is a flower bud or an open bloom on the cutting, pinch it off before placing the stem in water. The plant needs every bit of stored energy going toward root development, not toward maintaining a flower. This is similar to the principle behind deadheading roses properly — removing spent or unnecessary blooms redirects the plant’s energy where it matters most.
Timing varies depending on where you live in the US. If you are unsure about your local frost dates or growing window, the Planting Date Calculator can help you plan sowing and transplanting dates based on your climate zone.
Choosing and Preparing the Right Cutting
This step determines everything. I cannot stress this enough: a great cutting in mediocre conditions will outperform a poor cutting in perfect conditions every single time.
What to look for:
- A stem about four to six inches long, roughly pencil-thick in diameter
- At least two or three leaf nodes along the stem
- Disease-free, healthy foliage — no black spots, no yellowing, no signs of fungal infection
- A stem that has recently bloomed or is just past peak bloom
How to take the cutting:
Use clean pruning shears or a sterilized blade. This matters more than most beginners realize. A contaminated or dull tool crushes the stem tissue and introduces bacteria right at the cut site, which is exactly where you need clean, undamaged tissue for root emergence. Wipe your blades with rubbing alcohol before you cut.
Make a diagonal cut — a 45-degree angle — just below a leaf node at the base of the cutting. The angled cut increases the surface area exposed to water, which encourages faster root initiation. It also prevents water from pooling on the cut surface and causing rot.
Preparing the stem:
Strip the lower leaves from the bottom half of the cutting immediately. Any foliage that sits in or even near the water line will rot, and that rot spreads upward into the stem with alarming speed. Keep two or three sets of healthy leaves at the top — the cutting needs them to continue photosynthesis and stay alive while roots develop.
Remove any thorns from the lower portion of the stem as well. Thorns are small wounds waiting to happen, and submerged thorns can create entry points for bacteria.
If there is a flower bud or an open bloom on the cutting, pinch it off. The plant has a finite amount of stored energy. You want every bit of it going toward root development, not toward maintaining a flower.
Setting Up Your Water Propagation Station
You do not need expensive equipment. Here is what actually works:
Container: A glass jar or any transparent container works well. Mason jars are perfect — they are the right shape, easy to clean, and the mouth is narrow enough to hold the cutting somewhat upright. A small clear vase works equally well. Avoid opaque containers because you will not be able to monitor root development or spot algae growth early.
Water: Room temperature water is ideal. Distilled water is the gold standard because it contains no chlorine or minerals that can interfere with root development. If you are using tap water, fill your jar the night before and leave it uncovered — chlorine dissipates within 12 to 24 hours. Cold water from the tap slows root initiation; water that is too warm promotes bacterial growth.
Water level: Submerge only the bottom one to two inches of the stem. Do not push the cutting deep into the jar. The nodes just above the waterline often produce roots too, and they need some air exposure to do so.
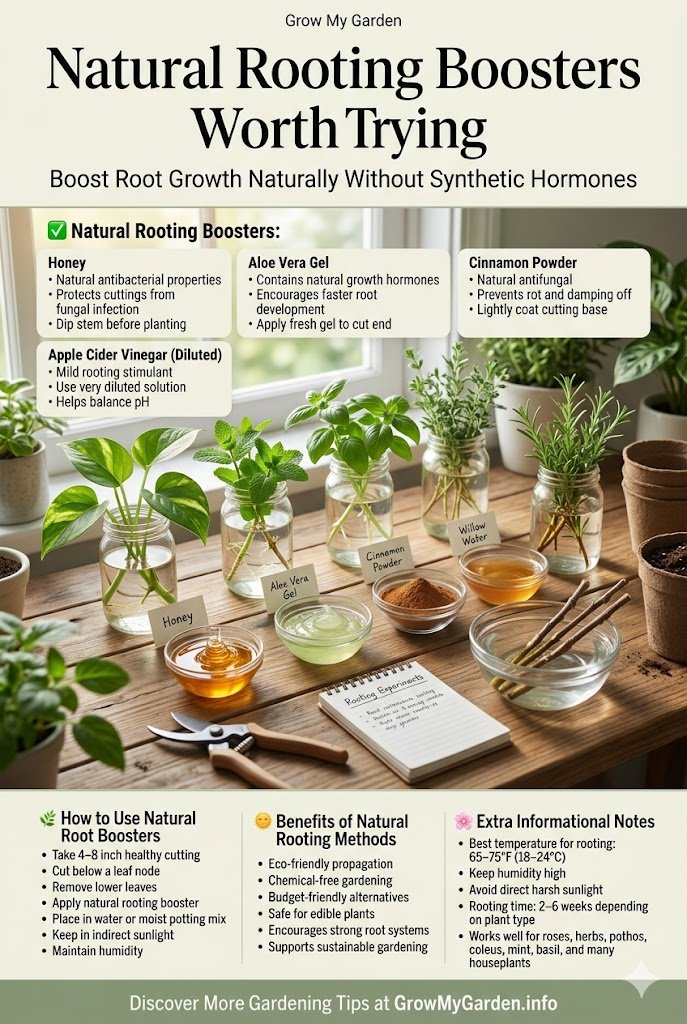
Natural Rooting Boosters Worth Trying
Plain water produces results on its own, but a few natural additions can meaningfully speed up root initiation. Here is what I have used with good results:
Willow water is my personal favorite. Willow bark and stems contain salicylic acid and indolebutyric acid (IBA) — the same active compound found in commercial rooting hormone powder. To make it, soak a handful of willow twigs or branches in a quart of water overnight. The water turns slightly golden and carries a faint herbal smell. Use this in place of plain water for your rose cuttings.
Aspirin water is a simpler version of the same chemistry. Dissolve one regular 325mg aspirin tablet in a quart of room temperature water. The salicylic acid signals the cutting’s stress response in a way that encourages adventitious root formation.
Aloe vera gel is another option worth trying. Fresh aloe contains enzymes and hormones that can support callus formation. Dip the base of the cutting in fresh aloe gel before placing it in the water. Some gardeners swear by it; I have found it works better as a complement to good water quality than as a standalone miracle.
Honey is sometimes mentioned as a natural rooting alternative. It does have mild antimicrobial properties. I would not call it a rooting accelerator in any meaningful sense, but a tiny amount dissolved in your water (no more than a teaspoon per quart) can help reduce bacterial growth.
Commercial rooting powder (IBA-based): Products like Bontone or Hormex are sold at Home Depot and Walmart for around five to eight dollars. Dip the cut end into the powder, tap off the excess, then place the cutting in water. Rooting hormone is water-soluble, so it does leach out over time, but the initial application still gives root initiation a significant boost.
Step by Step: The Complete Water Rooting Method
Step 1 — Morning harvest. Take cuttings in the early morning before heat stress builds in the plant. Make your diagonal cut just below a leaf node using a clean, sterilized blade.
Step 2 — Prepare the stem. Strip lower leaves, remove submerged thorns, pinch off any buds or flowers. Score the bottom inch of the stem with two or three shallow vertical scratches using a knife tip. This exposes the cambium layer underneath the bark — the layer where adventitious roots actually emerge — and gives them more exit points.
Step 3 — Optional boost. Dip the base in rooting powder or coat it with fresh aloe vera gel. Alternatively, use your pre-made willow water or aspirin water in the jar instead of plain water.
Step 4 — Set up the jar. Fill your clean glass jar or transparent container with room temperature water. Place the cutting so the bottom one to two inches are submerged. If the cutting keeps falling sideways in a wide-mouthed jar, stretch a small piece of plastic wrap over the top and poke a hole for the stem — this holds it upright and reduces evaporation.
Step 5 — Find the right spot. Place the jar in bright indirect light. A north or east-facing windowsill is ideal. Avoid south or west-facing windows in summer — the direct afternoon sun heats the water dramatically, which accelerates bacterial growth and stresses the cutting. The optimal temperature range for the environment around the jar is 65 to 75°F.
If you are propagating indoors in fall or winter, a grow light set on a 14-hour timer works extremely well. The Barrina T5 grow light strips are affordable and popular among indoor propagators in the US.
Step 6 — Change the water regularly. Every two to three days, pour out the old water, rinse the jar, and refill with fresh water at room temperature. This is the step most beginners neglect, and it is critical. Stagnant water becomes anaerobic quickly, feeding the bacteria responsible for stem rot. Fresh water also means more dissolved oxygen around the developing root sites.
Step 7 — Monitor and wait. Within the first week or two, you may notice a slight swelling or white cloudiness at the base of the stem — this is callus formation, a protective tissue that develops before roots emerge. It is a good sign. Actual white root tips typically appear within two to four weeks, depending on variety and conditions. Once roots are one to two inches long and look well-developed, you are ready to transplant.
Transplanting Your Rooted Cutting to Soil
Water roots and soil roots are structurally different. Water roots develop in a low-resistance, high-moisture environment and are often finer and more fragile than soil-grown roots. Planting them directly into dry garden soil causes rapid transplant shock, and many otherwise healthy cuttings die at this exact stage.
After transplanting, consistent but measured watering is everything. Too much kills just as effectively as too little. The Watering Schedule Tool can help you figure out exactly how much your bed needs each week based on plant size and conditions.
Here is how to make the transition smoothly:
Prepare a pot with well-draining soil. A mix of half potting soil and half perlite works well — it mimics the moisture-retentive but oxygenated environment the roots have been growing in. Make sure the container has adequate drainage holes.
Water the soil before planting. The soil should be evenly moist but not soggy when the cutting goes in. Dry soil pulls moisture away from the fragile new roots faster than they can adapt.
Plant carefully. Lower the cutting into the potting mix without bending or breaking the roots. Firm the soil gently around the base. Water again lightly after planting.
Create a humidity tent. Loosely drape a clear plastic bag over the pot to trap humidity around the cutting. This reduces the moisture demand on roots that are still adjusting to their new environment. Remove the bag for a few hours each day to allow fresh air circulation and prevent mold prevention issues.
Hardening off. After two weeks, start removing the tent permanently and allow the soil to dry slightly between waterings. This process — acclimatizing cuttings gradually to drier ambient conditions — is called hardening off, and it builds the toughness the plant needs to thrive without your intervention.
New leaf growth emerging from the nodes at the top of the cutting is your confirmation that the root system has established itself and is actively pulling water and nutrients from the soil.
If you are moving several rooted cuttings into a raised bed at once, figuring out how many bags of soil you need is easy with the Raised Bed Soil Calculator — it takes the guesswork out of buying
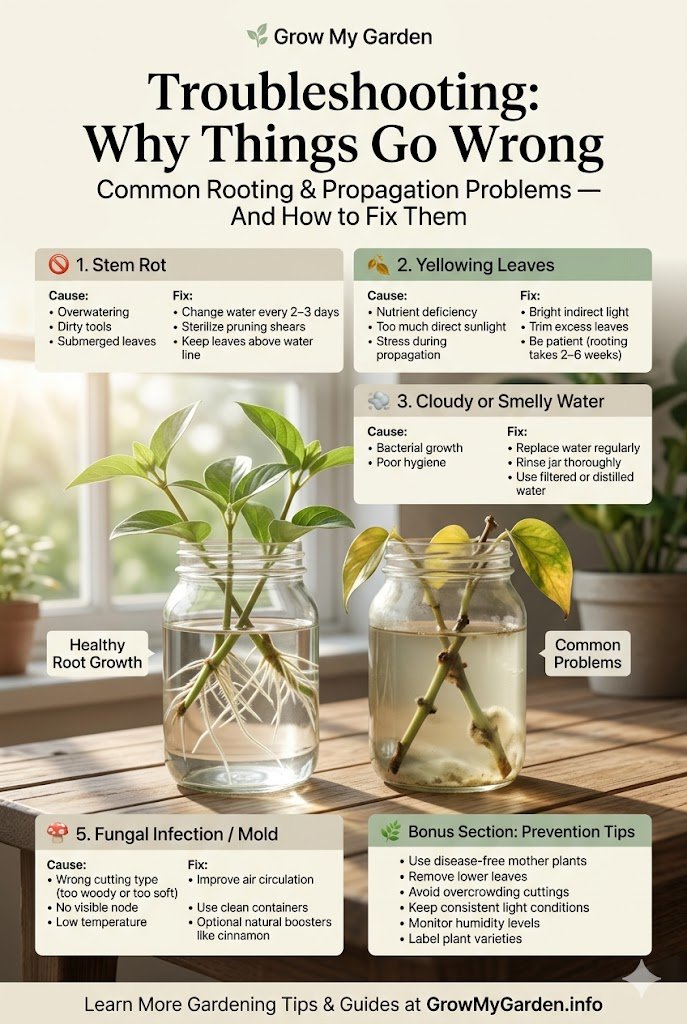
Troubleshooting: Why Things Go Wrong
Stem rot in water is the most common failure. It usually comes down to one of three things: water that was not changed frequently enough, a cutting with leaves sitting in or touching the water, or a stem that was already stressed or diseased when you took it. Prevention is straightforward: change water every two to three days, strip lower leaves completely, and always propagate from vigorous, disease-free growth.
Algae growth shows up as a green tint on the inside of the jar or a green film on the water surface. Algae thrives on light and nutrients. Switching to an opaque jar helps reduce it, but you lose the ability to monitor root development. A better fix is to keep the jar out of direct sunlight and change the water more frequently.
Wilting cuttings in the first few days are normal — the stem has been separated from its water supply and is adjusting. If wilting persists beyond three or four days, check that the water level is adequate and that the cutting is not in direct sun. Misting the leaves once a day during the first week can help.
Yellow leaves on the cutting usually indicate stress, overexposure to sun, or water quality issues. Remove yellowing leaves promptly — they begin to rot quickly and that rot can spread to the stem.
No root development after four weeks is frustrating but not necessarily fatal. Try changing to fresh willow water, move the cutting to a slightly warmer location, and double-check that the light is bright but indirect. Some varieties simply take longer. Floribundas and certain hybrid tea roses can stretch to six weeks before showing significant root emergence.
Failed propagation despite doing everything right does happen, especially with difficult varieties. A success rate of 60 to 80 percent is realistic for most home gardeners using water propagation. If a cutting fails, treat it as information, not defeat. Adjust one variable at a time and try again.
Can Roses Live in Water Permanently?
This question comes up often, and the short answer is: not really, not long-term. While roses can root and survive in water for weeks or even months, they eventually exhaust the limited nutrients available in plain water and begin to decline. Water propagation is a rooting method, not a permanent growing system. Once your cutting has a healthy root system, transitioning it to soil gives it access to the full spectrum of minerals and microbial activity it needs to grow, bloom, and thrive for years.
If you love the look of plants in vases, there are true hydroponic rose setups that use nutrient solutions rather than plain water — but that is a different system entirely, with its own equipment and management requirements.
People Also Ask
How long does it take for rose cuttings to root in water? Most rose cuttings show their first white root tips within two to four weeks. Full root development suitable for transplanting — meaning roots that are at least one inch long and look established — typically takes four to six weeks depending on the variety, water temperature, and light conditions.
Do rose cuttings root faster in water or soil? Water propagation often produces visible roots faster because you can monitor and optimize conditions precisely. However, soil-rooted cuttings tend to transition more smoothly to outdoor growing because the roots develop in the medium they will live in. Both methods work; water propagation is simply more beginner-friendly and more visually satisfying.
Can you use tap water for rose propagation? Yes, but let it sit in an open container overnight first to allow chlorine to dissipate. Heavily chlorinated tap water can slow root initiation. Filtered or distilled water is better if you want to remove that variable entirely.
How often should you change the water for rose cuttings? Every two to three days is the standard recommendation. In hot weather (above 80°F in your home), consider changing it every other day. Fresh water means more dissolved oxygen and fewer bacteria — both critical for successful root development.
Why are my rose cuttings rotting in water? The most likely cause is stagnant water that was not changed frequently enough, leaves that were left on the submerged portion of the stem, or a cutting taken from a plant that was already stressed or diseased. Sometimes it is simply a bacterial infection that took hold at the cut site. Sterilizing your tools before cutting and changing the water regularly are your best defenses.
Do I need rooting hormone for water propagation? No — many cuttings root successfully in plain water without any rooting hormone at all. That said, using a small amount of IBA-based rooting powder, willow water, or aspirin water can shorten the rooting timeline and improve your overall success rate, particularly with harder-to-root varieties like hybrid tea roses.
How do I know when to transfer cuttings to soil? When the roots coming from the base of the cutting are at least one inch long and look white, healthy, and well-developed. Roots that are barely emerging or less than half an inch long are not ready — transplanting too early is one of the most common causes of failure at the transition stage.
The Bigger Picture
A rose grown from a cutting will not produce its first real flush of blooms for one to two years. This is a long game, and that is okay. What you end up with is a plant genetically identical to its parent — same fragrance, same color, same growth habit — and you grew it yourself from a single stem placed in a jar of water.
I have a coral-colored climbing rose growing along my back fence right now that started as a cutting my aunt mailed to me from Ohio, wrapped in a damp paper towel inside a ziplock bag. I rooted it in a mason jar on my kitchen counter over about five weeks. That was four years ago. Today it covers eight feet of fence and blooms every June in a color I have never seen sold at any nursery.
No store can sell you that. It only exists because someone knew how to snip a stem and give it a chance in a jar of water.
Start with one cutting this spring. Even if it fails — and the first one might — you will understand something afterward that you cannot fully learn from reading about it. Roses are forgiving when you treat them with patience and a little respect. Get that part right, and the propagation will follow.
If you end up with several rooted cuttings — which happens fast once you get the hang of this — spacing them correctly in your garden bed matters a lot for airflow and long-term health. The Plant Spacing Calculator makes that planning simple.


Leave a Comment