
How to Fix Blossom End Rot on Tomatoes (and Stop It Coming Back)
The first time I flipped over one of my ripening tomatoes and found a sunken black patch on the bottom, I was sure some disease had moved into my garden. It hadn’t. That ugly spot is blossom end rot, and the good news is it’s almost always fixable once you understand what’s really going on.
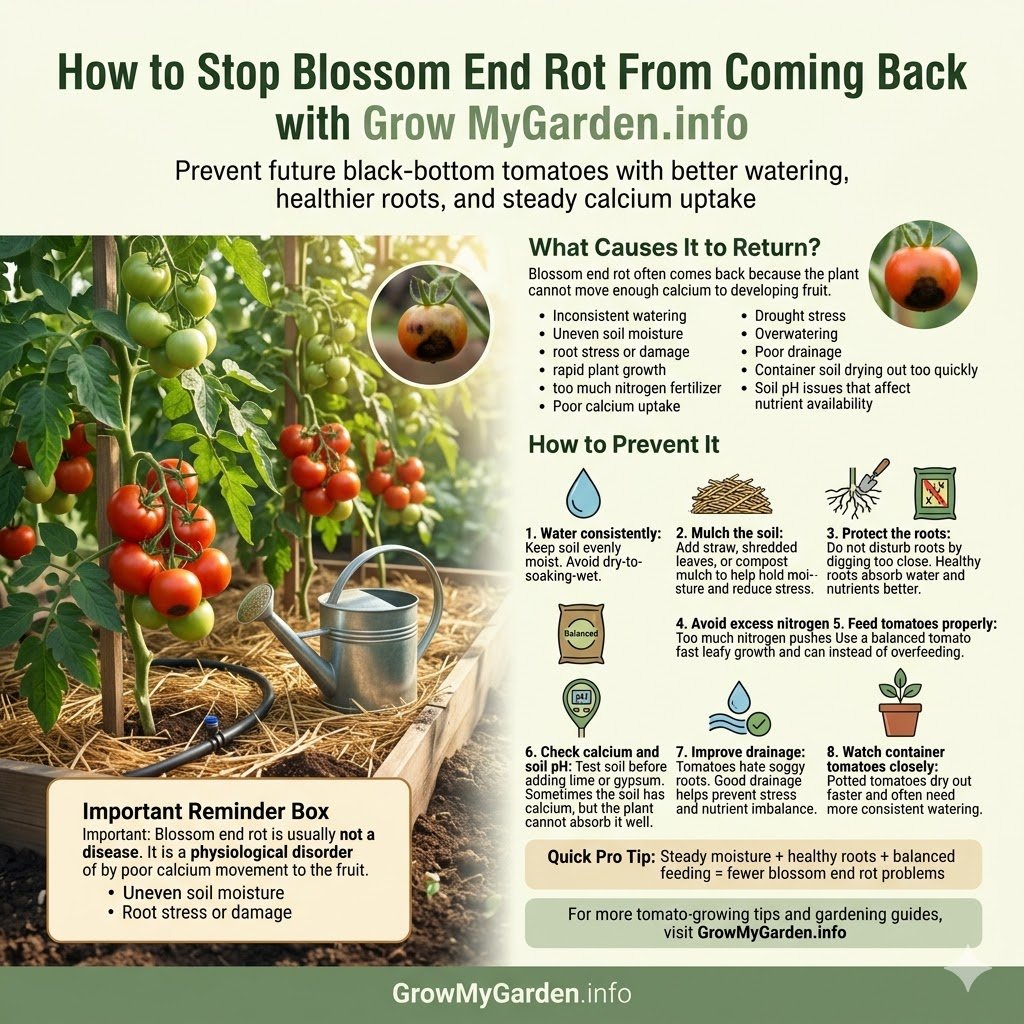
Despite how alarming it looks, it’s a physiological disorder, not an infection, usually triggered by a calcium deficiency in the fruit and made worse by inconsistent watering. Get your soil moisture steady and you’re already halfway to the cure. Here’s exactly how I fix it on my own plants, step by step, season after season.
What I was actually staring at was blossom end rot, and the fungicide did exactly nothing, because blossom end rot is not a disease. It’s a calcium problem tangled up with a watering problem, and once you understand that, fixing it gets a whole lot less stressful. I’ve dealt with it on beefsteaks, on Romas, on container cherry tomatoes baking on a hot patio. Below is everything I’ve learned the hard way, so you don’t have to torch a Saturday like I did. Read our Pest Control And Plant Health guide.
First, Take a Breath: This Isn’t a Plague
Here’s the good news right up front. Blossom end rot is a physiological disorder, not an infection. It is not a disease, it is not contagious, and it is not caused by a fungus or bacteria. You can’t catch it from one plant and pass it to the next. You won’t spread it on your pruners. Nothing is invading your garden.
The trouble is happening inside the fruit. Tomatoes need calcium to build sturdy cell walls, especially at the far tip of the fruit (the blossom end, opposite the stem). When calcium doesn’t reach that spot during a critical window of fruit development, the cells there break down and collapse. The result is that classic dark, leathery patch.
Now for the part that trips everyone up. Most of the time, your soil already has plenty of calcium. The issue is rarely a true shortage in the ground. It’s a delivery problem. Calcium is what gardeners call an immobile nutrient, meaning the plant can’t shuffle it around once it’s been parked somewhere. It rides upward through the plant’s plumbing (the xylem) on a stream of water pulled up by transpiration, the way a paper towel wicks up a spill. If that water stream stutters, calcium never makes it to the fruit tip in time, and you get rot even when the soil test says calcium is fine.
So when people dump bag after bag of calcium on their beds and the rot keeps coming, this is why. They’re treating the wrong end of the problem.
How to Tell It’s Actually Blossom End Rot
Before you fix anything, make sure you’re dealing with the right culprit. I’ve watched gardeners spray for blight when they had a watering issue, and vice versa.
Genuine blossom end rot shows up like this:
- It starts at the bottom of the fruit, never the top or the stem end.
- It begins as a small water-soaked spot, a little dull and bruised-looking.
- That spot grows into a sunken, leathery area that turns tan, then dark brown, then nearly black.
- The patch feels dry and flat, almost like old leather, not slimy.
- Sometimes the fruit looks okay outside but has interior browning when you slice it open.
- It loves to hit the first fruits of the season, then quietly disappears on later harvests.
If your spots are on the shoulders or sides of the fruit, you’re probably looking at sunscald (sunburn) or catfacing instead. If the skin is splitting in rings, that’s tomato cracking from uneven water. And if a fuzzy gray or black mold shows up later on a rotted spot, that’s a secondary mold infection moving into already-dead tissue, not the rot itself.
One more clue worth knowing: big fruit gets hit hardest. Large-fruited varieties like beefsteaks and paste tomatoes are far more prone to this than small cherry tomatoes, simply because there’s more fruit to feed and more distance for calcium to travel.
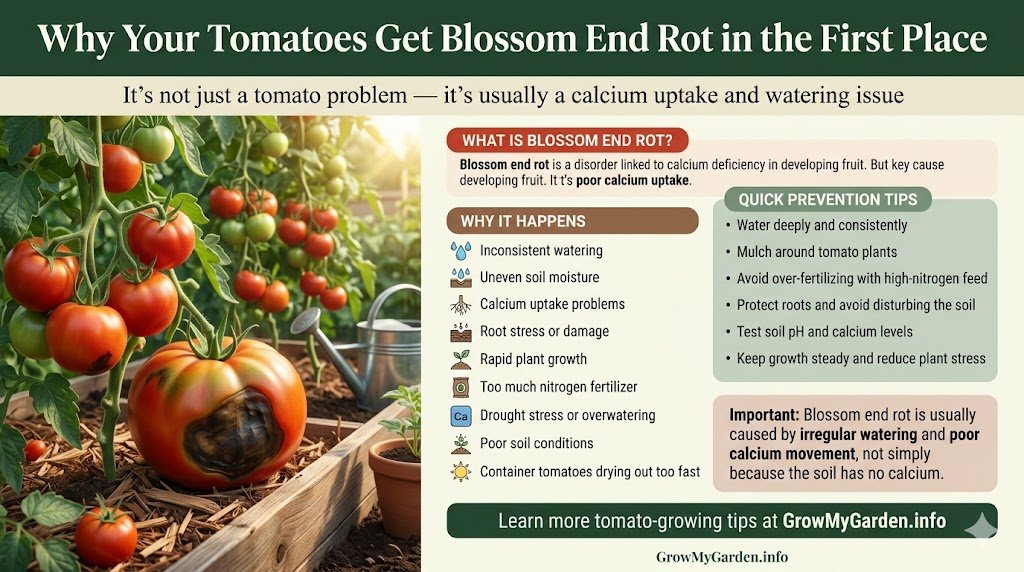
Why Your Tomatoes Get It in the First Place
Understanding the “why” is what lets you actually fix it instead of guessing. In my experience, nearly every case traces back to one or more of these.
Inconsistent watering. This is the big one. Irregular watering, where the soil swings from bone-dry to soaking wet and back, throws a wrench in calcium delivery every time the plant gets thirsty. Those wet-dry soil cycles are public enemy number one. Drought stress and general water stress during a hot spell will do the same thing in a hurry, especially when fruit is sizing up fast.
Containers and grow bags drying out. Pots dry out at lightning speed in summer. Container soil drying out between waterings is the reason BER is practically a rite of passage for patio tomato growers. I’ve seen a grow bag go from damp to crispy in a single August afternoon.
Too much nitrogen. Hitting your plants with high-nitrogen fertilizer pushes a flush of fast, leafy growth that outruns the calcium supply. Over-fertilization in general is a common own-goal. The ammonium form of nitrogen is especially guilty, because ammonium and calcium compete for the same root doorways.
Nutrient competition in the soil. Calcium doesn’t travel alone. Excess potassium and too much magnesium will elbow it out at the roots, a tug-of-war soil scientists call cation antagonism. A skewed calcium-to-magnesium ratio is a sneaky, underrated cause (and yes, this is exactly why the Epsom salt trick backfires, more on that soon).
Root damage and poor roots. Anything that hurts the root system limits water and calcium uptake. Root damage from aggressive hoeing, transplant shock, compacted soil, or root-bound seedlings that sat too long in their cells all set the stage for trouble.
Soil pH being off. Strongly acidic soil locks up calcium so the plant can’t grab it. Tomatoes are happiest in a slightly acidic to near-neutral range, roughly pH 6.2 to 6.8.
Cold, fast, early-season growth. Early in the year the soil is still cool, roots are barely established, and the weather bounces around. Cool soil slows calcium uptake right when the first cluster of fruit is forming, which is exactly why early-season tomatoes so often take the hit while midsummer fruit comes out clean.
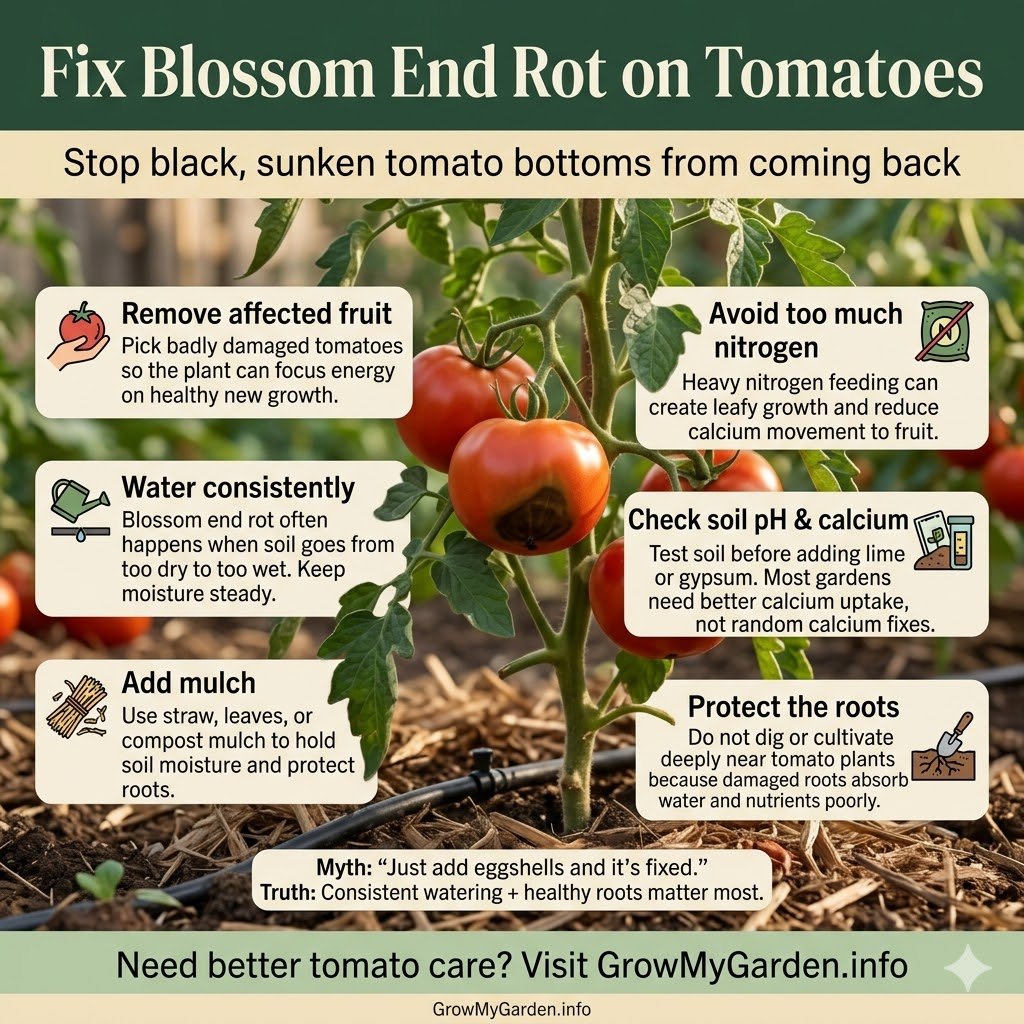
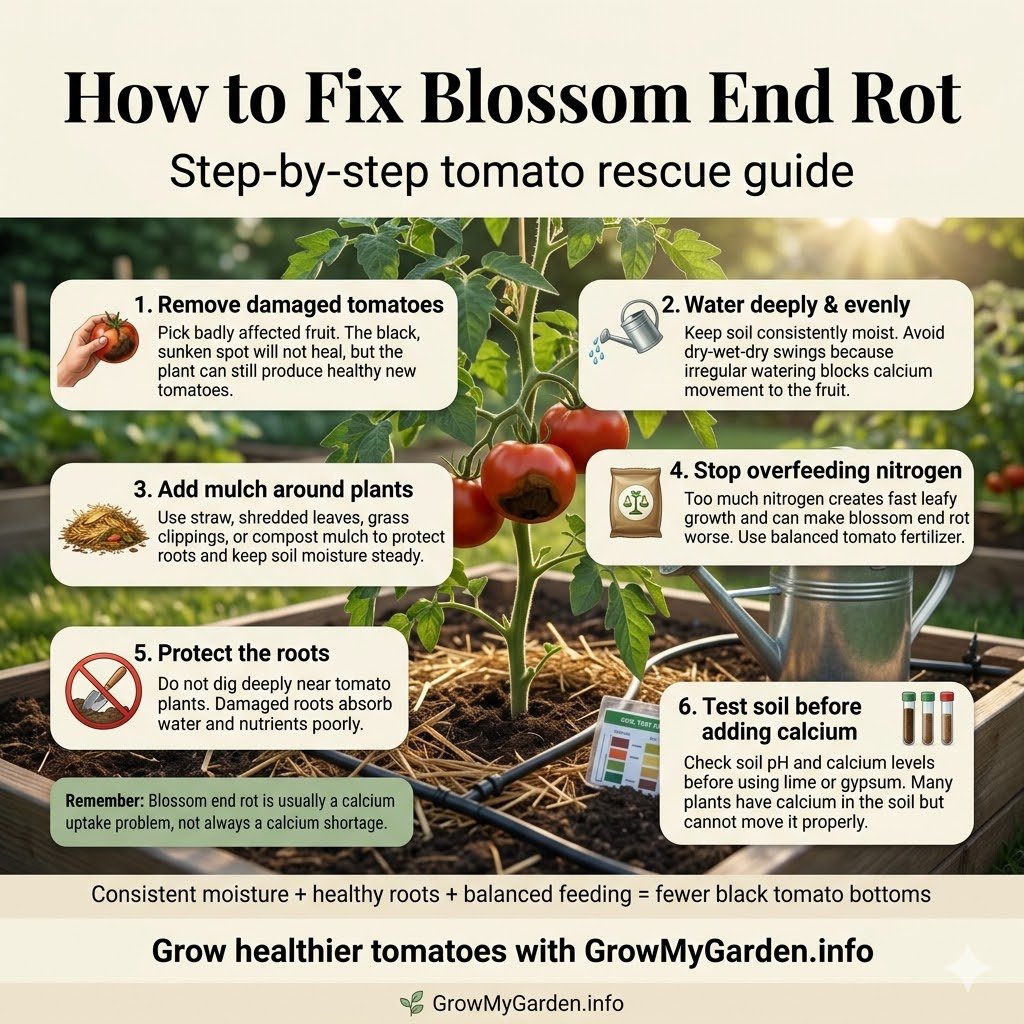
How to Fix Blossom End Rot, Step by Step
Alright, you’ve got rot on the plant right now and you want it gone. Here’s the order I work through. Do them in this sequence, because the early steps matter far more than the fancy ones at the end.
Step 1: Steady your watering immediately. This is the real cure, and everything else is a side dish. Your goal is even soil moisture, never bone-dry, never swampy. Water deeply so the moisture reaches the whole root zone, then let the top inch dry slightly before the next round. For most tomatoes that works out to roughly 1 to 2 inches of water per week, more in a heat wave. If you’re not sure how much that works out to for the size of your bed, my watering schedule calculator does the math for your garden in about a minute.
The single best upgrade I ever made was switching from hand-watering to a cheap drip irrigation kit on a hose timer. A simple battery timer (Orbit and Melnor both make reliable ones, and the Rachio or Orbit B-hyve smart timers let you tweak the schedule from your phone) takes human forgetfulness out of the equation. Consistency is the whole ballgame.
Step 2: Mulch to hold that moisture in. Lay down a 2 to 3 inch layer of organic mulch around the base of each plant. Straw mulch, shredded leaves, or wood chips all work great. Mulch acts like a sponge and a sunshade for the soil, smoothing out those moisture swings so the roots aren’t whiplashed every hot afternoon.
Step 3: Pick off the affected fruits. Don’t try to nurse a badly rotted tomato back to health. Remove the affected fruits so the plant stops pouring energy into a lost cause and redirects it to healthy fruit and steadier growth. Compost them. They won’t infect anything.
Step 4: Ease off the nitrogen. If you’ve been feeding a high-nitrogen product, stop. Switch to a balanced fertilizer or a tomato-specific blend that’s lower in nitrogen, so the plant isn’t sprinting ahead of its calcium supply. Since over-fertilizing is what lands a lot of people in this mess, it’s worth running the numbers through a fertilizer calculator so you feed the right amount for your bed size instead of eyeballing it.
Step 5: Try a foliar calcium spray as a stopgap (with honest expectations). A foliar calcium application can give young, still-developing fruit a little direct top-up while you get the watering sorted. A diluted calcium chloride spray or calcium nitrate solution sprayed on the foliage and young fruit in the cool of early morning is the usual approach, and ready-to-use Cal-Mag or water-soluble calcium products do the same job without mixing. I’ll level with you, though: tomato fruit absorbs very little calcium through its skin, so the science on foliar sprays is mixed at best. I treat them as a band-aid, never the cure. If you skip Step 1, no spray on earth will save you.
Step 6: Fix the soil for the long haul. This is a season-ahead move, not an overnight fix. Get a soil test first so you’re not guessing. If the test shows low calcium and low pH, a lime application (calcitic lime, or dolomitic limestone if your magnesium is also low) will raise pH toward that 6.2 to 6.8 zone and add calcium. If your pH is already fine and you just want more calcium without changing it, agricultural gypsum (calcium sulfate) is the tool for the job. These amendments work slowly, so think of them as setting up next season, not rescuing today’s fruit.
A quick word of encouragement: once you’ve nailed the watering, most plants simply grow out of it. The later fruit comes in clean, and that first ugly batch becomes a distant memory.
The Epsom Salt Myth That Refuses to Die
If I had a dollar for every time someone told me to “just throw some Epsom salt on it,” I could buy a greenhouse. So let me set the record straight, because this advice doesn’t just fail, it can make things worse.
Epsom salt is magnesium sulfate. It contains zero calcium. Blossom end rot is a calcium delivery problem. Adding magnesium to fix a calcium issue is like topping off your gas tank to fix a flat tire. Worse, magnesium and calcium compete for the same uptake pathways at the root. Pile on extra magnesium and you can actually crowd out the very calcium your fruit is begging for. So please, keep the Epsom salt for your bath, not your tomato bed.
A few other folk remedies deserve a reality check while we’re here:
- Crushed eggshells in the planting hole. Eggshells are mostly calcium carbonate, sure, but they break down painfully slowly. They won’t release usable calcium this season. Grind them to a fine powder and add them months ahead, and maybe you’ll see a slow benefit. As an emergency fix, they’re useless.
- Milk spray and Tums tablets buried in the soil. Charming garden lore, thin evidence. I wouldn’t bank my harvest on either.
- Bone meal. It does carry some calcium, but it’s heavier on phosphorus and releases very slowly, so it’s no quick fix.
The honest takeaway is unglamorous: there’s no magic powder. Even chelated calcium and homemade calcium sprays are minor players. Steady moisture is the real MVP, and everything else is just supporting cast.
How to Stop Blossom End Rot From Coming Back
Curing this year’s outbreak is one thing. Making sure you don’t ride this merry-go-round every June is the real win. Here’s what’s kept my plants clean season after season.
- Set a watering schedule and stick to it. A consistent watering schedule is 90 percent of prevention. I jot watering days right into my phone calendar with a reminder, the same way I’d remember to pay a bill. A moisture meter (the inexpensive probe type, like an XLUX, runs about ten bucks) takes the guesswork out, telling you whether the root zone is actually dry or just dry on top.
- Water at the roots, evenly. A soaker hose or a proper drip irrigation system delivers slow, even water right where it counts and beats hand-watering for consistency every time.
- Mulch every plant. That same 2 to 3 inch organic mulch layer that helps treat rot is your best prevention too. Keep it topped up through the season.
- Test before you plant. A soil test before planting tells you your pH and nutrient levels so you can amend smartly instead of dumping random products. A home kit like the Luster Leaf Rapitest is fine for a quick read, but a mail-in test through your local Cooperative Extension office gives you the real, detailed picture, and it’s usually cheap or free.
- Feed gently. Lean on a balanced or low-nitrogen fertilizer and resist the urge to overdo it. More food is not more tomatoes.
- Build better soil. Work in compost for well-draining soil that still holds moisture. Soggy, waterlogged soil and rock-hard compacted soil both suffocate roots, so aim for that crumbly middle ground.
- Give plants room and a good start. Proper spacing keeps roots from fighting, and hardening off seedlings plus easing transplant shock gets them established without a setback.
- Container growers, mind the dry-out. Pots need water more often, full stop. Self-watering planters like an Earthbox were honestly a turning point for me on the patio, because the built-in reservoir keeps moisture steady no matter how forgetful I get. Bigger containers dry out slower than small ones, so size up when you can.
It’s Not Just a Tomato Problem
Here’s something that surprises a lot of folks. Blossom end rot isn’t picky about tomatoes. The same calcium-and-water mechanism causes blossom end rot on peppers, on zucchini, and on summer squash too. If you spot a sunken brown bottom on your bell peppers, you already know the playbook: steady the water, mulch, and don’t panic. The fix is identical.
It also helps to know your plants. Determinate tomatoes set most of their fruit at once, which can briefly spike calcium demand, while indeterminate types fruit steadily over a long season. Big heirloom and paste tomatoes ask more of the plant than little cherries do. None of that changes the cure. It just explains why some of your plants get hit while the cherry tomato two feet away shrugs it off. Read How to Get Rid of Tomato Hornworms: 7 Proven Methods That Work.
Questions Gardeners Keep Asking Me
Can you eat tomatoes with blossom end rot?
Yes. As long as the rest of the fruit looks and smells fine, just cut away the leathery brown bottom and eat the good part. The only time I’d toss one is when secondary mold has crept in and the whole fruit has gone soft or funky.
How do I fix blossom end rot that’s already on the plant?
You can’t reverse an already-rotted fruit, but you can stop new ones from getting it. Even out your watering, lay down mulch, pull off the worst fruits, and the next round usually comes in clean. Steady soil moisture does the heavy lifting.
Will removing the affected fruits actually help?
It helps the plant, not the rotted tomato. Pulling damaged fruit lets the plant spend its energy on healthy growth instead of a lost cause, which speeds up the recovery of the next batch.
Does Epsom salt fix blossom end rot?
No, and it can make it worse. Epsom salt is magnesium, not calcium, and the extra magnesium competes with calcium uptake. Skip it for this problem entirely.
Is blossom end rot contagious?
Not at all. It’s a physiological disorder, not a disease, so it won’t spread plant to plant or hitch a ride on your tools.
Why do my tomatoes get blossom end rot every single year?
Almost always inconsistent watering, sometimes paired with too much nitrogen or an off soil pH. Nail down a steady watering routine, mulch well, and get a soil test, and the yearly cycle usually breaks.
What’s the best calcium spray for tomatoes?
A diluted calcium chloride or calcium nitrate foliar spray, or a ready-made Cal-Mag product, will do the job as a stopgap. Just keep your expectations modest, since fruit absorbs little calcium through its skin. Fix the watering first.
Does blossom end rot spread to peppers and other plants?
It doesn’t “spread,” but the same conditions can trigger it independently on peppers, squash, and zucchini growing nearby. Treat the cause (uneven moisture) and they’ll all benefit.
Why are only the first tomatoes affected?
Early in the season the soil is cooler, roots are still settling in, and growth is fast, so calcium can’t keep pace. As the plant matures and the weather steadies, later fruit typically comes in perfectly fine.
Does it matter if I grow in containers versus in the ground?
It does. Containers dry out far faster, so BER is more common there. More frequent watering, larger pots, or a self-watering planter goes a long way toward keeping container tomatoes happy.
If there’s one thing I wish someone had told me before I wasted that fungicide, it’s this: blossom end rot is your tomato’s way of complaining about its drinking habits, not a death sentence. Get the water steady, throw down some mulch, ease up on the feeding, and your plants will almost always sort themselves out. The first sad, black-bottomed tomato of the year is a nudge, not a verdict. Fix the routine, and by midsummer you’ll be slicing fat, flawless tomatoes and wondering what you were ever worried about. Now go check your soil moisture before that next heat wave sneaks up on you.

Leave a Comment